Electric Dryer
No Power
Click on the Steps below to jump directly to that section:
**NOTICE**
Wiring Colors, Connectors, and Pins will vary by model/product code. Always be sure to download and use the service manual for your specific model.
For Test Mode procedures use this link and input your specific model: https://lgtestmodes.com/
If unit will not power up, check the power source.
Check the specification label on the unit for proper supply voltage required.
Electric dryers need 240Vac or 208Vac.
Check voltage while powering the unit on and trying to run a cycle. If voltage measured drops below the required voltage then the customer’s electrical system is the cause. The customer will need an electrician to repair their receptacle, breaker or electrical wires in their home.
If the unit requires 240V ac or 208V ac see the configurations below for 3 wire or 4 wire receptacles. It must have 120 Vac from neutral to L1 for the unit to power up.

Disconnect & Reconnect Dryer to Power. Check for 120 Volts ac on Black wire to Red wire. Press “Power” button and should now read 0 Volts ac Black to Red.
Note: Ohm check “Power” button switch from Black wire to Yellow wire. The switch is Normally closed. Press button and switch opens.
RED 4 PIN CONNECTOR. Pin 1 is black, pin 2 is red, pin 3 is yellow.

Check power at display board.
Check the following voltages
Red wire to Orange wire should be 10 ~ 15Vdc
Red wire to Yellow wire should be 5Vdc
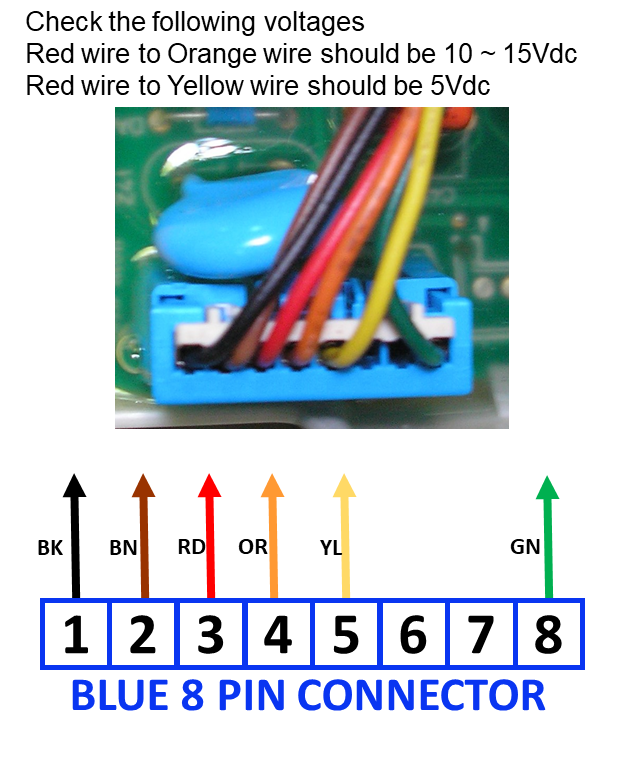
BLUE 8 PIN CONNECTOR
If the MAIN PCB has 120 volts and the power button is functional and the MAIN PCB does not produce the necessary 12Vdc needed to illuminate the display then the MAIN PCB is defective.
If the DISPLAY PCB has 12Vdc and does no illuminate then the DISPLAY PCB is defective.