Standard Icemaker Theory of Operation
There are 4 things needed for Ice Production to occur:
- Correct Temperature.
- A Functional Icemaker.
- Water.
- Time.
1) Correct Temperature.
The first thing you should always verify if a unit is not producing any ice is the temperature at the icemaker.
While water freezes at 32°F the LG Icemakers require a much colder temperature to operate and harvest. For an LG Icemaker to harvest the temperature will need to be below 15°F.
If the icemaker that is having issues is in the freezer section, then the first check to make would be verifying the temperature in the freezer section. If the icemaker is in the left refrigerator door, then you would want to verify the temperature in your ice room area. The best method to read the temperature is with a thermocouple.
If the temperatures are warmer in these areas when tested, then you would want to check for cooling or airflow issues instead of an icemaker failure.
If the temperatures are reading correctly (below 15°F) and there are cubes in the tray, but the icemaker just will not cycle on its own, then you would want to check your ice maker sensors to make sure they are reading correctly.
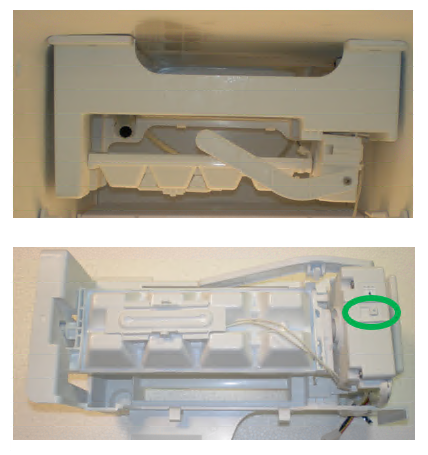
These Icemaker sensors can be labeled differently from model to model, but the key will be the word “Ice” when looking for the sensors on the wiring diagram. The sensors can be located on the Main, Display, or Sub PCB depending on model. Examples below from model LRFVS3006:
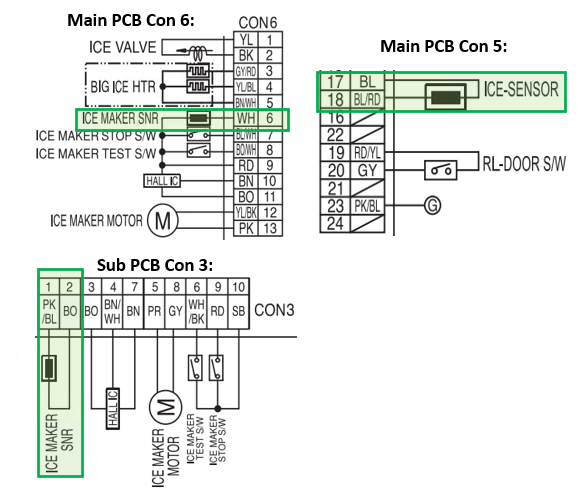
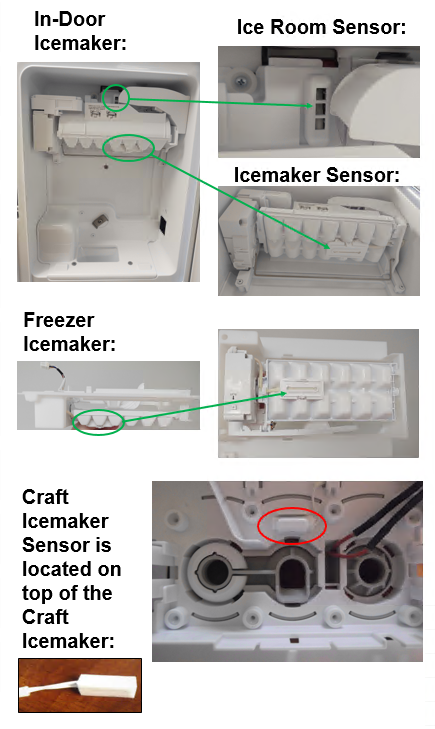
Below are some examples of the locations of the sensors…
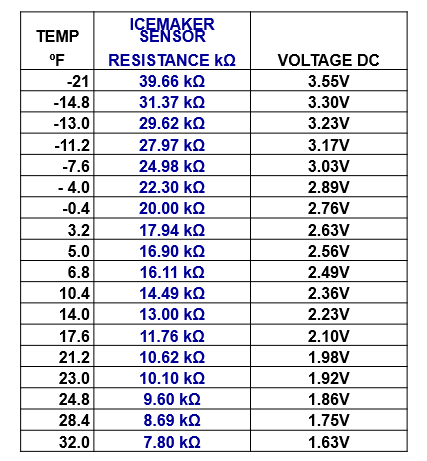
The good news is that the icemaker sensors ohm out the same for all models regardless of what board they are connected to. The below chart can be used to determine if your sensor is reading correctly…
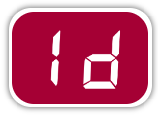
-Another thing to check for would be error codes. Single icemaker refrigerators and in-door icemakers will display an “IS” error if the ice room or ice tray sensor reads open or short. Dual Icemaker Models will Display an “IS” for upper icemaker sensor failures and “Id” for sensors reading open or short at the lower / freezer icemaker.

-In the case that the freezer temperature is correct (close to 0°F) but the ice room in the left refrigerator door is too warm (above 15°F) then you would need to check for an airflow issue between the icemaker fan and the ice room. Frost buildup around the icemaker fan can also cause issues. If the fan is stopped for more than 3 hours an “IF” error can be displayed.

2) Is the Icemaker Functional?
Once you have verified temperature is correct, the next thing to check would be to see if the icemaker is turned on. This seems very simple but is sometimes overlooked by customers.
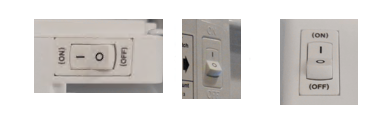
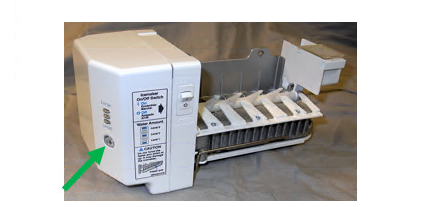
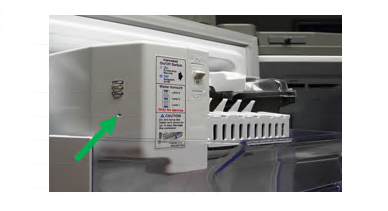
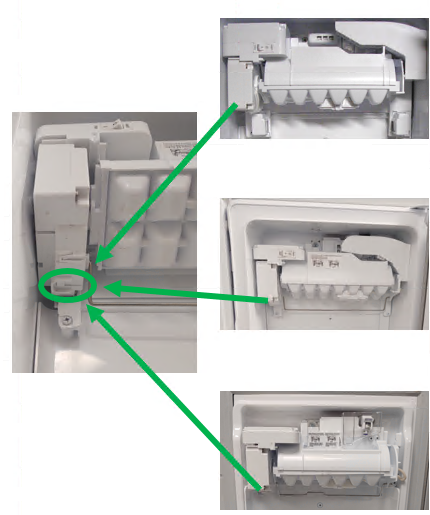
If the icemaker has a physical on/off switch located on the icemaker, make sure it is turned to the ON position:
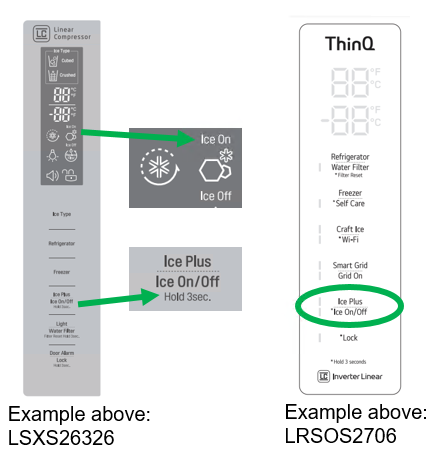
Some Icemakers do not have a physical on/off switch. Instead, the on/off function will be found on the Display. Examples Below:
Make sure the Icemaker is Powered ON then continue to next step… Test Mode.
Every Icemaker has a test button that makes checking functionality easy. Simply hold the test button for 3-5 seconds or until the icemaker starts to move. The icemaker should then go through a full harvest cycle. Note: If there is water or ice in the tray you will need something catch the water / ice during the test cycle.
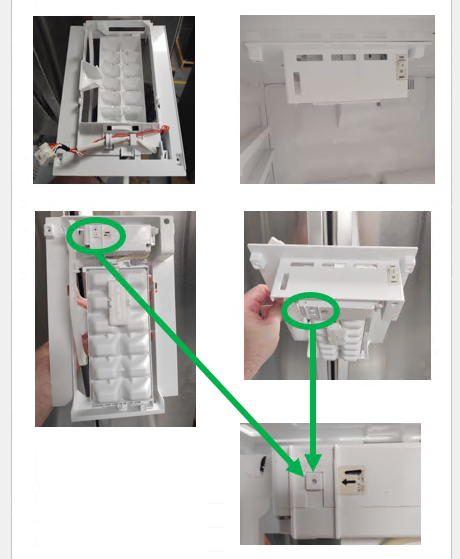
The test button can be in different places on different icemakers. If you have trouble locating the test button, please check the service manual for your specific Model / Product Code. Below are some examples of the common test button locations:
Heat Release Icemaker Test Button Locations
For Test Mode press and the cube size selector button for 3-5 seconds or until the icemaker starts to move:
For Icemakers with small holes instead of large buttons like the below example, use a toothpick, paperclip, or similar object to press the cube size selector button for 3-5 seconds or until the icemaker starts to move:
Twist Tray Icemaker Test Button Locations
-Early Twist Tray Icemakers had the motor and test button located on the right side of the icemaker. Press and hold 3-5 seconds or until icemaker starts to move for test mode:
In-Door Twist Tray Icemaker Test Button Locations
Newer Twist Tray Icemakers have the motor and test button located on the left side of the icemaker. Press and hold 3-5 seconds or until icemaker starts to move for test mode:
Freezer Section Twist Tray Icemaker Test Button Location
Newer Twist Tray Icemakers have the motor and test button located on the left side of the icemaker. Press and hold 3-5 seconds or until icemaker starts to move for test mode:
If the icemaker will not cycle in test mode, try resetting the whole unit by disconnecting power. If the icemaker still will not cycle in test mode after reset, you will need to check for harness connection issues. In-Door Icemakers will have 3 connection points (Main / Display / or Sub PCB, Left Door Hinge, Icemaker). Freezer Icemakers will have 2 connection points (Main PCB and Icemaker). Reseat all connectors in the icemaker circuit and try test mode again.
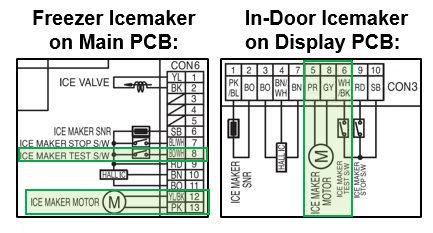
If the Icemaker still does not cycle in test mode after resetting all connectors, you will need to see if there is any voltage being output by the PCB that powers the icemaker. For this you will need to refer to the service manual for your specific model and product code as the icemaker could be powered from the Main PCB, Sub PCB, or the Display PCB.
Examples from LRMVS3006 dual icemaker model:
3) Water.
Once you have verified temperature is correct and icemaker will function, next thing to check for would be for water supplied to the unit. If the unit has a dispenser, you can press the paddle and verify you have proper flow through the unit.
Then you need to check for water supplied to the icemaker. Most icemakers you can simply look into the ice tray and visually inspect for water or cubes.
If there is no water making it to the icemaker there could be issues with water valve(s), frozen fill tube, kinked water line, bad wiring connection, etc.
Water Valves… On almost all models there will be a Pilot Valve on the back of the refrigerator in the machine room. Then there will also be a secondary water valve, the location of the secondary valve can change by model and layout. The secondary valve will typically be found in the left refrigerator door on French Door models. On SxS refrigerators the secondary valve is typically found in the machine room with the pilot valve or in the water tank area in the refrigerator section. Both the Pilot and Secondary valves must energize together for the icemaker to fill.
A quick way to see if the valve circuits are working is to run test mode on the icemaker. At the end of the test mode the valves should energize, and the icemaker should fill with water. If you listen closely, you can hear the valves humming if the circuit is being energized.
Looking at your wiring diagram, the Pilot Valve is almost always found on the Main PCB. The Secondary Valve can also be on the Main PCB but are often located on the Sub PCB as well. Make sure you look at the wiring diagram on the unit itself or download a service manual specific to your model and product code.
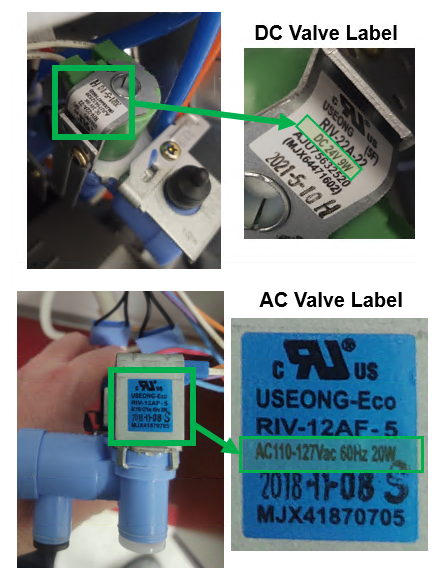
Water Valves used to all be 120Vac but around 2018 LG started using 24Vdc valves. If you are ever in question about what type valve your unit has, there are labels on the valves that show the voltage rating. Or you can look in the service manual in the troubleshooting portion for water dispenser issues and the voltage will typically be shown there. Examples Below:
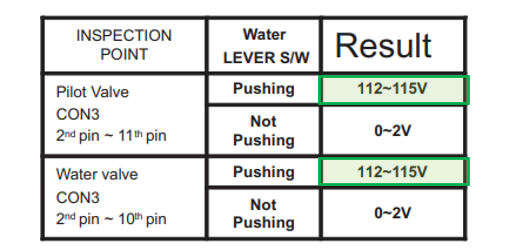
Example from LSXS26326 Water Not Dispensing Troubleshooting in Service Manual:
4) Time.
Now that you have verified proper temp, that your icemaker is functional, and is receiving water… The last thing needed for ice to be produced is Time.
If the unit was just installed it can take up to 24hrs before icemaking will begin.
Once the unit has reached temperature and the icemaker makes its initial harvest, it should start cycling every 60-80 minutes as long as the unit is maintaining proper temperature.