Dishwasher
No Power
Click on the Steps below to jump directly to that section:
**NOTICE**
Wiring Colors, Connectors, and Pins will vary by model/product code. Always be sure to download and use the service manual for your specific model.
For Test Mode procedures use this link and input your specific model: https://lgtestmodes.com/
Connect to a properly rated, protected, and sized power circuit to avoid electrical overload. The appliance must be installed and electrically grounded by qualified service personnel in accordance with local codes.
Use a dedicated electrical circuit rated for:
15 Amps, 120 Volts AC. This unit requires an electrical ground to be properly installed.
For a permanently connected dishwasher: This appliance must be connected to a grounded metal,
permanent wiring system, or an equipment-grounding conductor must be run with the circuit
conductors and connected to the equipment-grounding terminal or lead to the appliance.
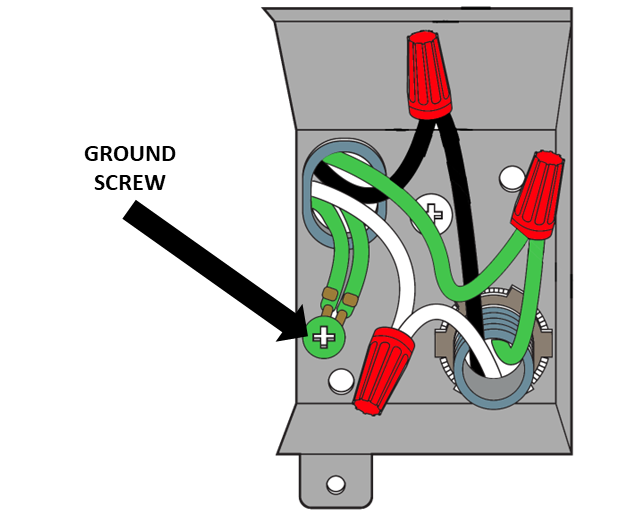
Connect the ground wire to the green ground connector in the terminal box.
Also a GFCI receptacle can be used if required.
If the unit does power on but does not run it will most likely give an error code within a few minutes. If you have a specific error code then you will need to follow the troubleshooting information in the error code section. If no error code is present then follow the below suggestions to determine why the unit does not run.
Verify water supply valve under customer’s sink is fully open and check water supply pressure for 20psi or greater.
Insure the water supply hose is not kinked, pinched or crushed behind or under the washer.
Check the unit with test mode and perform all tests to verify why unit is not running. Check voltage to the wash motor. If motor is getting voltage and the motor does not run then replaced the motor. If no voltage from main board then replace the main board.
Door Is Not Shut
Check that the door is shut properly. The dishwasher will not operate if the door is ajar, so make sure to close it firmly. Make sure there’s nothing stopping the door from closing fully.
Child Lock Feature Is On
If start button is not responding, it may be the child lock. The child lock feature is designed to prevent little ones from turning on the unit.
To turn off child lock, consult your owner’s manual. Each model has a different method for doing this, so it’s important to know which one applies to your dishwasher. Once child lock is disengaged, the dishwasher machine should start up normally.
Using Incorrect Settings
If your LG dishwasher turns on but won’t start and isn’t responding to any commands, it’s possible you’re using the wrong settings. Delay wash will result in the dishwasher not starting until the selected time, so if you’re trying to start a cycle right away, that could be the issue.
If the display board has 12-16.5vdc supplied to it and does not light up the leds then replace the display board.
Example wiring diagram taken from model LDF5545. Most newer dishwashers will very similar to this wiring diagram. Consult the service manual for the specific model of dishwasher you are working on.
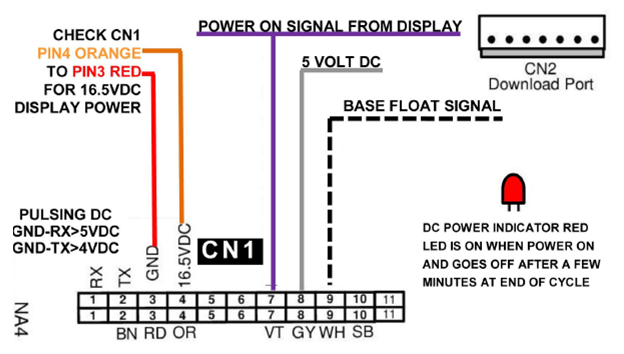
Check from Red (GND) to Orange (12Vdc for older models, 16.5Vdc for newer models) using a multimeter to determine if the main board is sending 12-16.5Vdc to the display. If it is not then this will cause the display board to not have any leds lit up. If main board does not send 12-16.5Vdc to the display board then replace the main board. If the display board does get 12-16.5Vdc and does not light any leds then replace the display board.