range / oven
Undercooking or uneven cooking
Click on the Steps below to jump directly to that section:
**NOTICE**
Wiring Colors, Connectors, and Pins will vary by model/product code. Always be sure to download and use the service manual for your specific model.
For Test Mode procedures use this link and input your specific model: https://lgtestmodes.com/
OVEN COOKING COMPLAINTS COOKIES & CAKE
Cake is flat– Overly/under mixed, oversized pan used, racks not adjusted correctly, oven
temperature to high/low, no eggs used, mix exposed to high humidity, excessive liquid or not enough liquid in mix.
Cake has fallen – under baked, excess/too little liquid in mix, pan too small, cake moved before
fully cooked, checked to early.
Cake crust sticky – under baked, placed in sealed container before cooling, excess liquid in mix, high humidity.
Cake has holes – Oven temperature too high, oven rack not adjusted correctly, over or under mixed, air bubbles in mix, wrong pan used.
Cake shrunk – cake placed too close to oven wall or another pan, over mixed.
Cake tall in center – pan too small, wrong pan used, oven temperature too high, pan too close to wall or another pan.
Crust not brown – oven door opened excessively, excess liquid in mix, oven temperature too low, pan is too deep for recipe, excess mixing.
Cake is dry – over baked, too little liquid in mix, eggs not used.
Cookies dark on bottom – oven rack not adjusted properly, sheet on wrong rack, dark pan used.
Oven cookware must be the correct size for what the recipe calls for. Shiny aluminum pans are best for light browning such as cakes, muffins, and cookies. Ceramic, glass, and metals are best for dark browning when crispy crust is desired. Dark cookware is best used for pies and pastries. Flat, shallow sided pans are best used for cookies and biscuits where browning on top and sides are desired.
OVEN TEMPERATURE CHECK
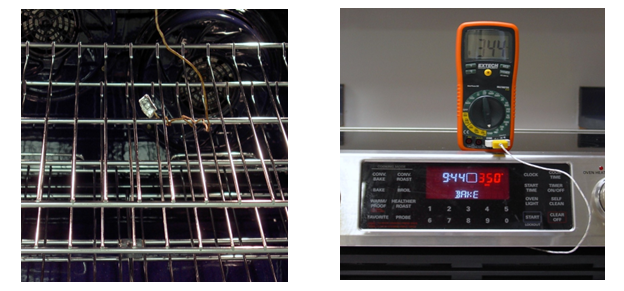
- ALWAYS START WITH A PREHEATED OVEN
- Use a loaded test probe
- Position the probe in the center of the oven.
- Remember the temperature is based on an average, so perform an average temperature test.
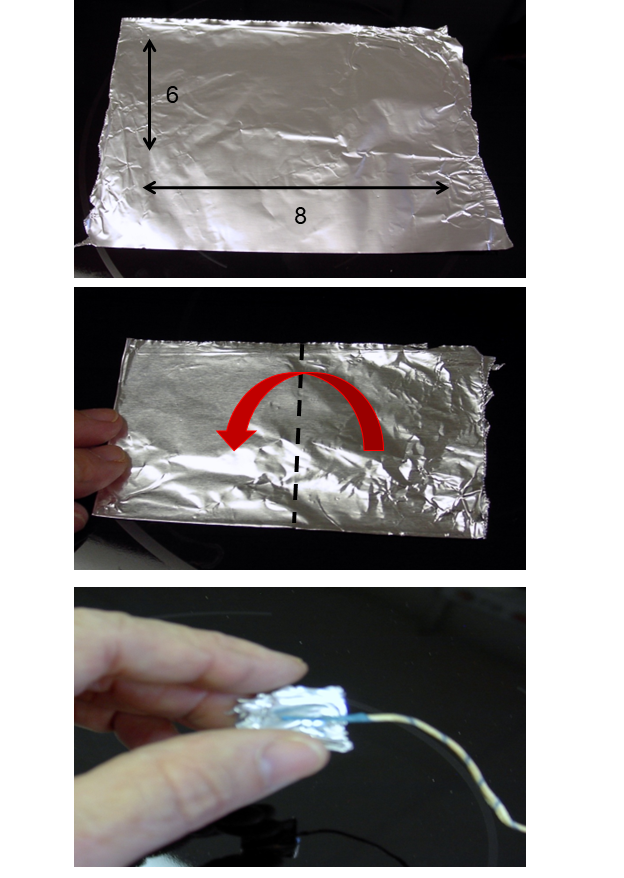
Using a load on the end of your temperature probe will prevent large temperature swings when checking the oven temperature. The load can be made by starting with a 6 x 8 piece of aluminum foil (or equivalent). Keep folding the foil in half on itself until you are left with a piece about 1 inch long. Finish off by folding this piece over the tip of the temperature probe end.
EXAMPLE OF AN OVEN BAKE CYCLE TEST @400°F
Pre heat the oven to 400°F. The longer the better but at least 20 minutes. Put a loaded probe in the center rack and cycle once. Then take the average high & low temperature for three cycles. Divide the average by 6.
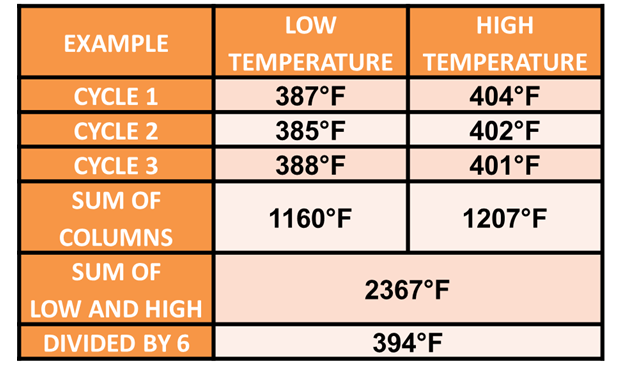
The average temperature is 394⁰F. Now you
can go to the settings menu and adjust the temperature + 6⁰F to achieve a
proper calibration and reach the desired temperature.
Single Oven Calibration Press the Settings key until ADJ displays To Increase Temperature Enter desired temperature increase, then press Start to save. To Decrease Temperature- Enter desired temperature decrease, press Settings to display -, then Press Start to save.
Double Oven Calibration – Upper Press the Settings key until U-AJ displays To Increase Temperature Enter desired temperature increase, then press Start to save. To Decrease Temperature- Enter desired temperature decrease, press Settings to display -, then Press Start to save.
Double Oven Calibration – Lower Press the Settings key until L-AJ displays To Increase Temperature Enter desired temperature increase, then press Start to save. To Decrease Temperature, Enter desired temperature decrease, press Settings to display -, then Press Start to save.