Craft ICEMAKER Software Update
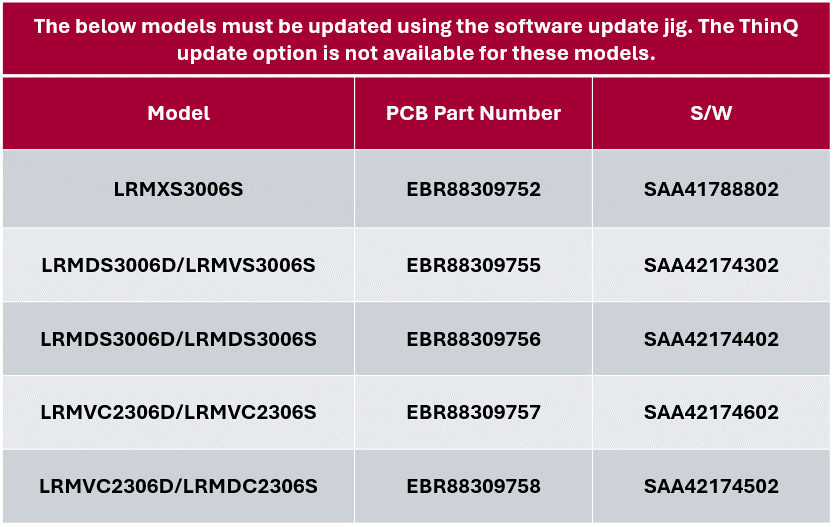
Many Craft Icemaker replacements require a Software Update to be performed. If you are unsure if your model requires a software update, look for service bulletins listed for your specific model. To do this you will need to use GSFS or LGTA App. The Service bulletins are: CNZ202200380-01, CNZ202200379-01, CNZ202200378-01
Special Note:
To perform the Software Update you will be using the same jig that you use for Compressor Software Updates. Make sure your Jig has been updated with Software Version (8.14) or higher.
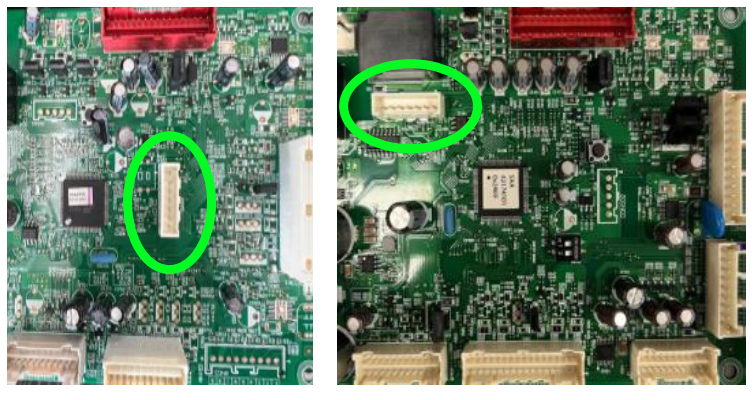
You need to be sure that you locate the correct connector on the Main PCB to plug the jig into to perform the software update. There are typically 2 unused connectors on the Main PCB.
You are probably familiar with the compressor connector, that is not what we want to use for the Craft Icemaker software update.
Locate the unused connecter on the board furthest away from the compressor connector. It is typically a 7-Pin Connector as pictured in the 2 examples below…
Caution: Make sure and unplug the refrigerator from the wall or disconnect power to the unit before attempting to update the software. Failure to do this can cause damage to the PCB and Jig.
You will be using the RED connector that came with the software update jig when you first purchased the jig. ONLY the RED connector should be used.
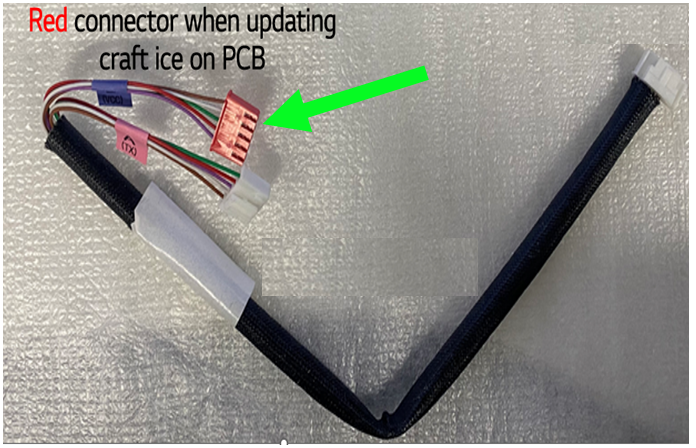
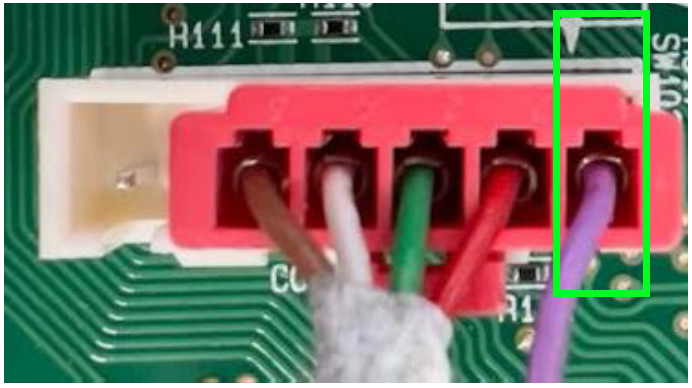
The Red connector of the jig only has 5 pins. The unused connector on the Main PCB will typically have 7 Pins. But no worries! You can still connect and update the software.
Locate Pin 1 on the PCB connector. It will be marked with a white arrow as shown below:
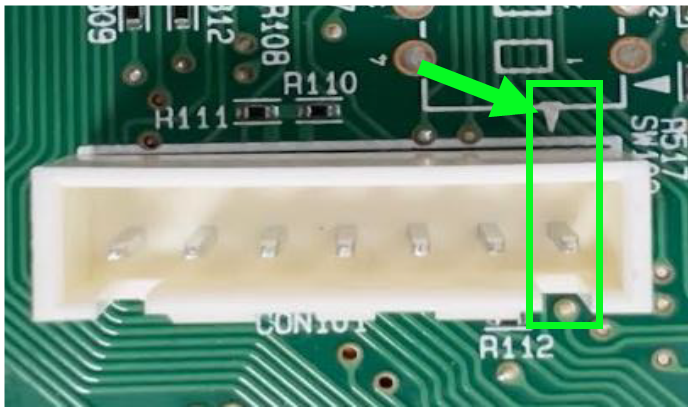
Align the Purple Wire of the RED Jig connector with Pin 1 on the Main PCB connector that you just identified.
Note: You may feel resistance when trying to plug the 5 Pin Jig Connector to the Main PCB, this is ok, it will go with a little extra force.
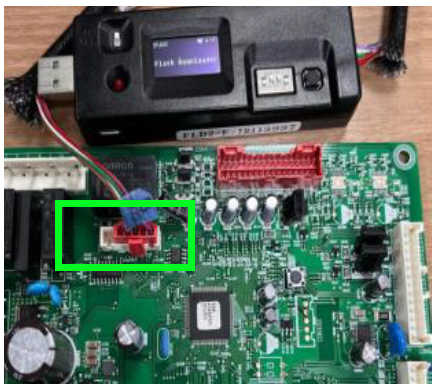
The full connection will look like this:
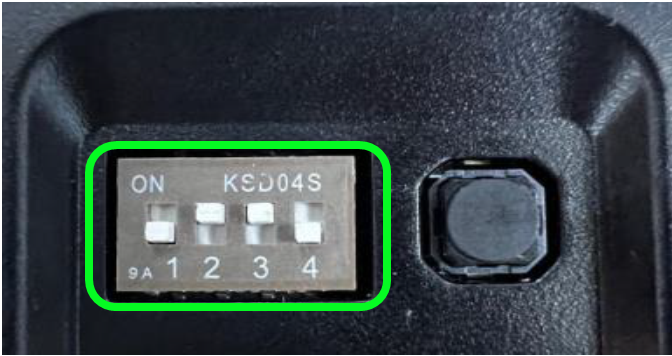
All that is left to do is make sure the Dip Switches are in the proper position on the Jig and you are ready to begin the software update. Switch 1&4 Down, Switch 2&3 Up as shown below:
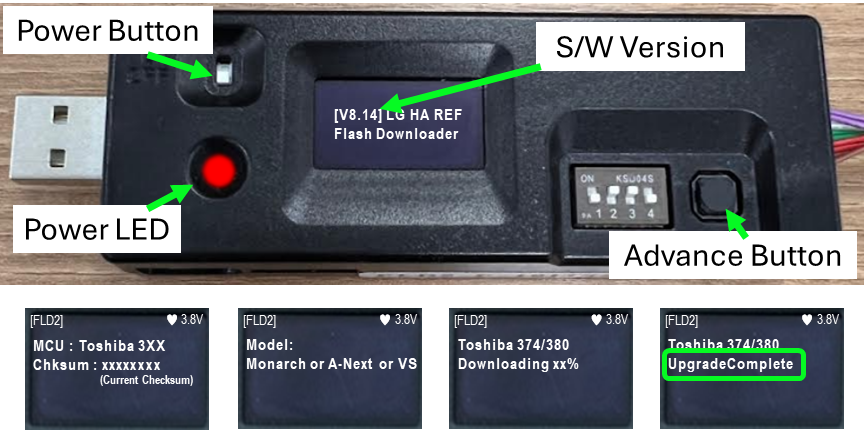
- Power on the Jig. Power Indicator should illuminate Red.
- Check the Software Version making sure it is 8.14 or higher.
- Press the Advance Button. (You may have to press the Advance Button 4 or more times to advance through all the screens and there will be beeps while doing this. Keep pressing the button until you see the Downloading Progress start to increase. Once at 100% you should get an “Upgrade Complete” message).
- Power off the Jig, disconnect from the Main PCB and you have completed the Craft Icemaker Software Update.
22 Responses
should the fridge be plugged in??? the service guide PDF says to unplug it or the jig and board may me damaged. NO mention of that here. I updated it just now with the unit unplugged. I guess I’ll wait to get a callback from the customer to find out since techline was NO help
Good catch Chris.
Yes, power to the refrigerator should be disconnected before updating software. This has been added to the article under Step 3. Thank you for the comment.
Can the software update be done with refrigerant in the unit? The paperwork that came with the new universal compressor says to have it removed, however, everywhere else says the refrigerator just needs to be unplugged.
Yes, the software can be updated with refrigerant in the unit. Just make sure the unit is unplugged from power before attempting to update the Main PCB.
What does the compressor update do as a proactive update, non compressor change
It changes the speed and stroke of the compressor to make it run more efficiently.
Everytime i attempt this the jig completely powers off. It’s fully charged & all. It works for compressor software updates but the craft ice it’ll just power down, I’ve never got this to work.
We have seen that happen on a few occasions. Try unplugging ALL connectors from the board and see if it will update, normally it will with all connectors unplugged.
Model:LSXS26366D/11
Serial:106MRVB17279
Trying to update software with compressor change. Con202 has no marking for VCC or TX. What do I do?
Pin 1 will have a white arrow beside it to identify it as Pin 1.
Take an ohm reading from (Pin 1 to Pin 2) & then (Pin 2 to Pin 3).
If (Pin 1 to Pin 2) resistance is greater than (Pin 2 to Pin 3) use the white connector.
If (Pin 1 to Pin 2) resistance is less than (Pin 2 to Pin 3) use the red connector.
I want to be able to toggle settings on the fridge. I want the button lights to stay on. Also, when you knock on the glass door the interior light comes on, but only for 10 seconds. I want to make that stay on as well.
Suggestions???
The control panel lights and the lights for the Instaview door are defaulted to turn off after a few seconds like you described. These settings cannot be changed as that is how the Main PCB is programmed to operate.
I get no match on the jig when I try to update the icemaker and compressor. I have the 8.14 version. Does the fridge no need the update?
8.14 is not the newest version of Software for the jig. You need to have 8.15 on your jig. You can download the Software from here: https://lgrepair.com/apps/#comp
Hello, red light on jig not coming on And won’t complete update
You should be able to remove the SD card from the jig, insert it into a card reader connected to a laptop or PC, and reformat it. After that, you can upload fresh software. This should resolve the problem. If you need further assistance, please contact TCC.
I saw a PowerPoint about an additional module and harness for the jig that prevents the firmware update jig from blanking out due to detecting too high a voltage when flashing the board. It says there is no part number for it. Do you know where to get it? Is it necessary for the craft ice maker firmware update?
That was a repair idea when Craft Icemaker updates first started. Some of the early models would cause the jig to blank out. But now the Main PCBs should all be updated and that issue should not happen anymore. Those jig adapters in questions were being shipped out on a case by case basis and a part number was not issued.
how do we get the right software for the craft icemaker update or is it the same file that uses the compressor software update
You can download the latest software from this link: https://lgrepair.com/apps/#comp … The latest software is 8.15 Rev17 , this includes Compressor and Craft Ice Files.
V8.15 being used to update craft icemaker. Works on most but 10% show ( no match ). Why is this?
M#LRMVC2306D /02
S#405KRCFP2107
All connections have been removed from control
Chksum:000054c6, displays, press black button then display shows (no match) 0x54c6
The service bulletin for your model shows to be for serial # range 906-207. Since yours is a couple years newer it likely already has updated Software on the PCB.