Yoder Loop Leak Test
In the event you believe the Yoder Loop is leaking the below tests will need to be conducted.
Before Isolating Yoder Loop Gather Proper Readings:
Before isolating a Yoder Loop or even tapping into a sealed system you need to have gathered the below readings from the unit….
– Temperature inside the unit.
– Compressor Amp Draw.
– Compressor Voltage.
– Evaluate Frost Pattern.
(And of course, you need to rule out all factors that could mimic a sealed system issue. Airflow Issues, Defrost Issues, Fan Issues, etc. Before ever tapping into a unit).
Once you tap you need to record…
– High Side Run Pressure
– Low Side Run Pressure
(It is best that the unit has been running for at least 25 minutes before gathering these pressures so that you are seeing accurate readings. Many units have a start up process where the compressor does not run full stroke for the first 25 minutes. This means it would be wise to contact the customer the day before or hours before you arrive to make sure the unit has been plugged in and running so you do not have to wait once in the home.)
Equalization Test (needed if pressures could sway to leak or restriction. A restriction after the drier can mimic high side leak pressures):
– An equalization test can be done to rule out restrictions. Pressures should equalize in under 10 minutes if there are no restrictions.
– Once the unit equalizes, record what pressure it equalizes at. (Note that Ambient and internal temperatures will affect what PSI the pressures will equalize at).
All the above should be recorded in your notes in GSFS (if possible) for all sealed system repairs. In the case that you need to contact TCC the agent will need the information above to properly diagnose with you.
If the above readings do not point toward High Side Leak then troubleshoot for low side leak, restriction, inefficient compressor, or whatever the case may be.
If the above readings point toward High Side Leak you will need to isolate your high side components and check for leaks.
1)Pressurize the whole high side to 200psi and bubble test all visible joints and leak points. (Joints at Compressor, Condenser, Drier).
2)If you do have a drop in pressure on the high side and can find no
leaks at any joints then isolate the condenser and test it by itself.
3)If no joints on the High Side are leaking and the condenser is not
leaking, then the Yoder can be tested.
It is important to periodically test your equipment. Faulty equipment can lead to misdiagnoses, and reclaims. When contacting TCC you will be required to verify the following steps have been followed and the agents will be gathering pictures of the processes. (Note: If you have visible evidence with bubbles of the yoder leaking in an unrepairable location then the below steps will not be necessary. Examples will be given at Step 2 of some visual Yoder Loop leaks). Otherwise, below is the process that will be required.
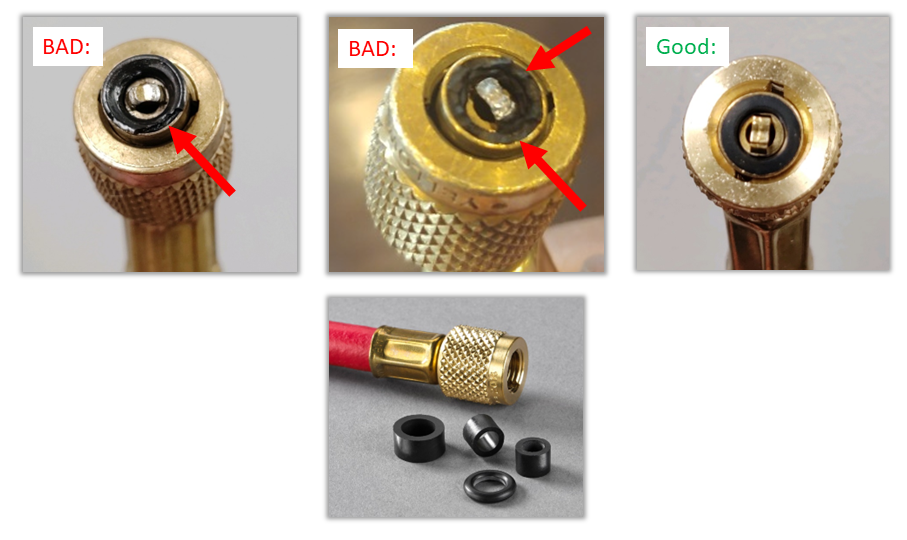
Step 1: Inspect Hose Seals
Before starting, inspect hose seals to see if they are torn, flaking, or damaged in any way. Below are examples of good and bad hose seals. If the seal is defective, please replace before proceeding onto the next step.
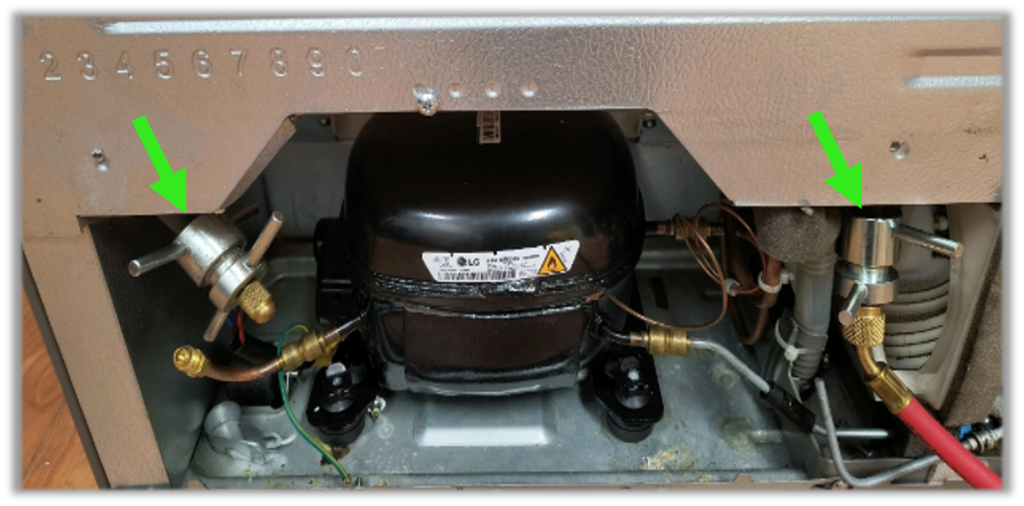
Step 2: Properly Isolate the Yoder and Pressure Test
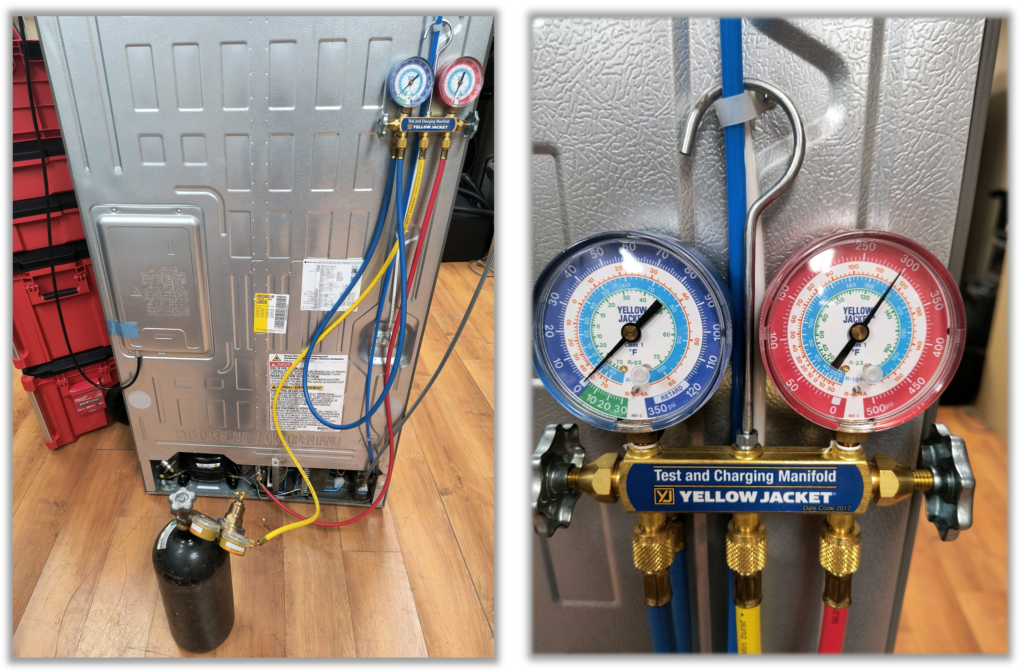
The Yoder needs isolated like shown below. One side needs to be capped off with a spin on fitting for R600a and the other connected to the high side gauge only. If this is an R134A system, one side of the tubing can be soldered closed or a schrader valve may be soldered on or use the spin on fitting.
Pressurize the Yoder to 300PSI using the high side gauge only. Once 300PSI is accomplished close the high side valve. Wait at least five minutes to check for a drop in pressure.
If there is a drop in pressure on an isolated Yoder Loop then spray your connections to make sure you did not create a leak there. If your connections are leak free then move to the next step.
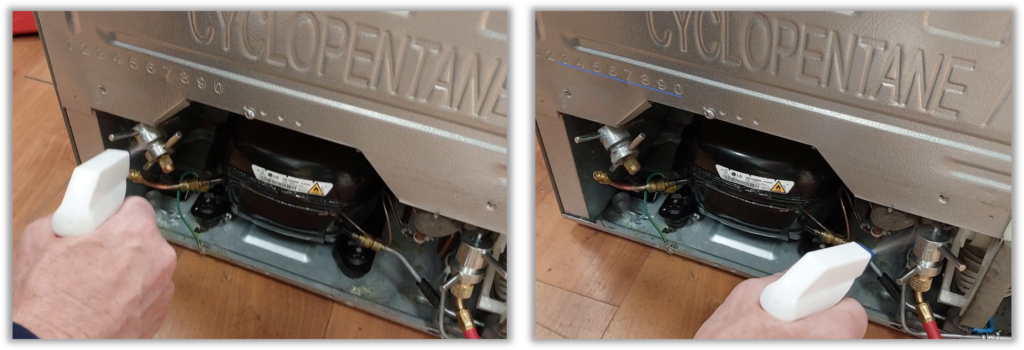
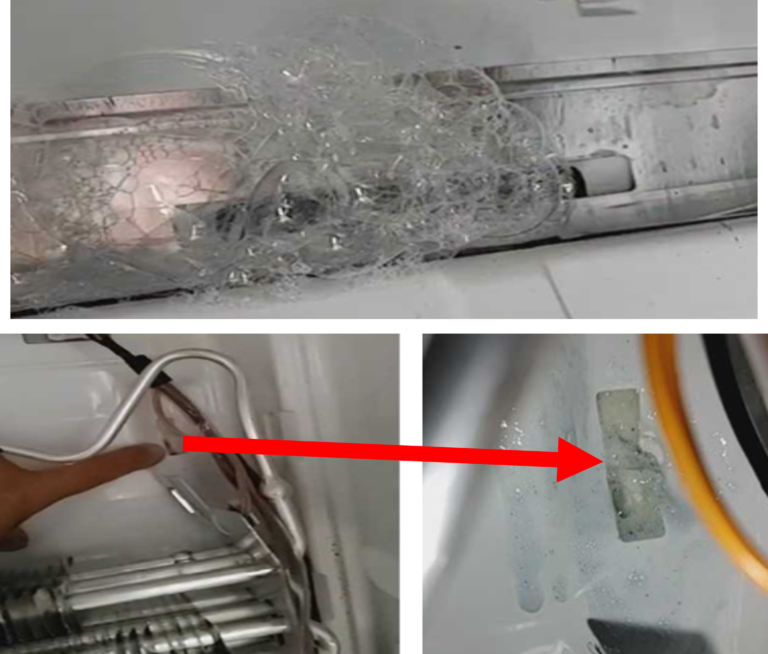
Look for signs of rust at the liner and cabinet seams. Spray seams with bubble solution. Below Examples are below the refrigerator door hinges in the mullion area between the refrigerator and freezer sections:

Spray bubble solution around the refrigerator return duct, defrost drain pan, defrost drain hole, and evaporator hanger locations in the liner. Below are some examples of where Yoder leaks have been found in some of these locations:
Step 3: Pressure Test Your Equipment
You will need to test your high side gauge, manifold, and hose for leaks. To do this connect your red hose to the back of your manifold and pressurize your high side gauge to 300PSI then close the high side gauge. You can now close and disconnect from your nitrogen tank and watch for 5 minutes to see if the pressure drops.

If the pressure drops during this test then your gauge, manifold, or hose is leaking. You will need leak free equipment before the Yoder leak can be verified.
If there is no drop in pressure during the equipment test but there is a drop when testing the properly isolated Yoder then a leak in the Yoder has been verified.