Restriction After Drier
Now that you have accurately diagnosed the issue with the sealed system, click the below button for Sealed System Repair Contents:
A restriction after drier will show Low Side pressure below normal (typically deep vacuum), and High Side pressure ambient or below normal as indicated in the gauge examples below. Amp Draw and Voltage will be lower than normal. There will be no to very little frost pattern depending on exact location of the restriction.
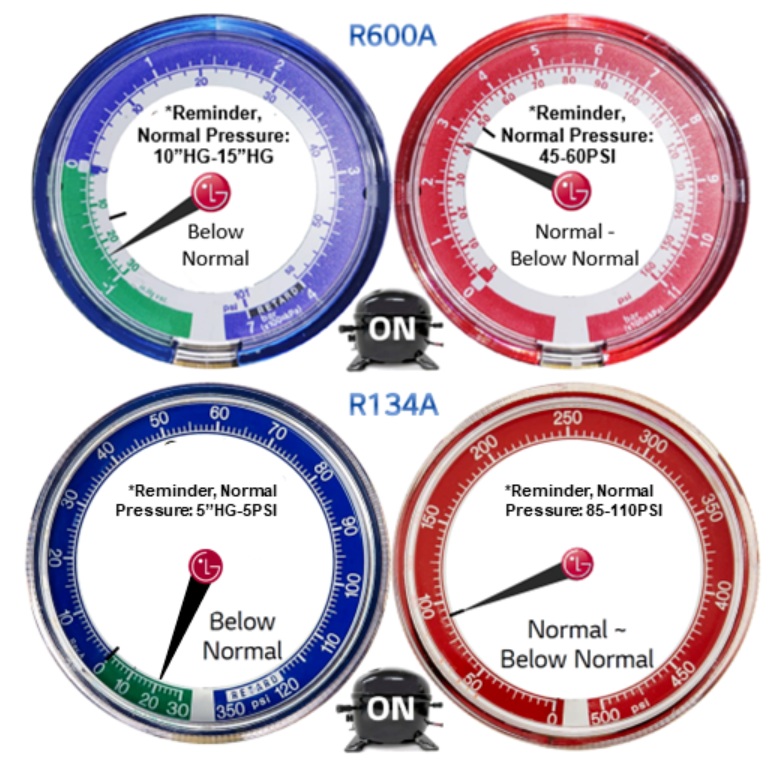
The pressures are reading this way because of the location of your gauges in reference to the restriction, the low side is in a deep vacuum because the compressor has pushed all the refrigerant into the high side, and the restriction is now making the high side act like a refrigerant storage tank which will show ambient pressure.
Restrictions slow down refrigerant flow.
Slow moving refrigerant will not pick up as much heat so the pressures will be lower than normal.
Refrigerant that is not moving at all (full restriction/blockage) will release its heat and return to ambient temperature/pressure.

- The Red Dots above illustrate the most likely places you will find restrictions that take place after the drier.
- The Most Common Place for a restriction to occur after the drier is of course in the Capillary Tube due to its tiny internal diameter. Any sludge or debris that makes it through the drier can cause a clog in the Capillary Tube. Few cases of Evaporator Restrictions have been reported as well.
- In many cases the Capillary Tube becomes restricted because of technician error, using too much solder or lokprep. If you did not start out with a restriction issue but now have one after replacing sealed system parts there is a chance you have caused a restriction at one of your joints.
- In a dual evaporator unit if only one coil is receiving refrigerant the chances of capillary tube restriction is very high.
- Restrictions can be caused by,
- Contaminates in the system
- Poor vacuuming of the system
- Poor cleaning of a previous failure
- Dull cap tube cutters
- Overuse of solder or Lok prep
- Kinks in tubing
- Clogged dryer or 3-way valve.
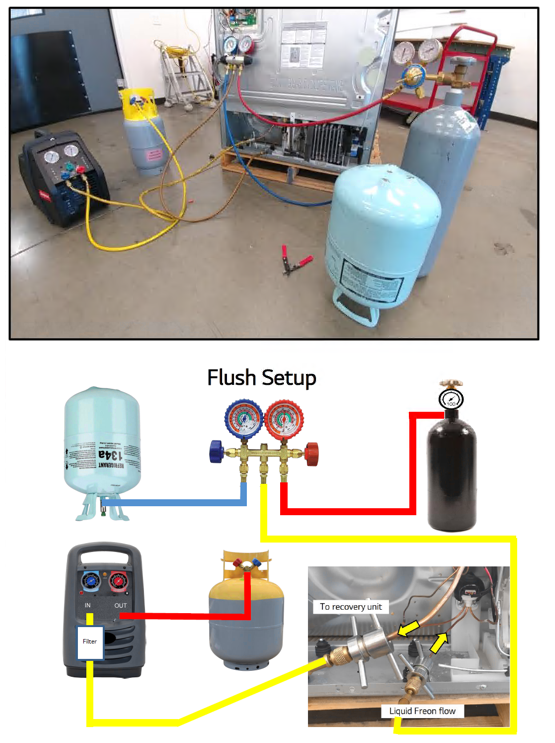
- Once you have identified the location of the restriction, the above illustration shows how to connect your equipment and hoses to flush the system.
- Remember when you flush with liquid refrigerant it will need to be recovered.
- 200 psi is acceptable against the whole system, and 300 psi when the yoder or capillary tubes are isolated by themselves.
- Because of the check valve in a dual evaporator unit, only the fresh food side can be back flushed.
- If there is sludgy oil causing your restriction it likely will not blow out right away. In some cases you may need to leave pressure against the restriction for several minutes (we have seen 15-30min in some cases). Once you establish flow with nitrogen then complete with a refrigerant flush.
Same unit flushed with only nitrogen first, this is why it is necessary to also flush with liquid refrigerant.
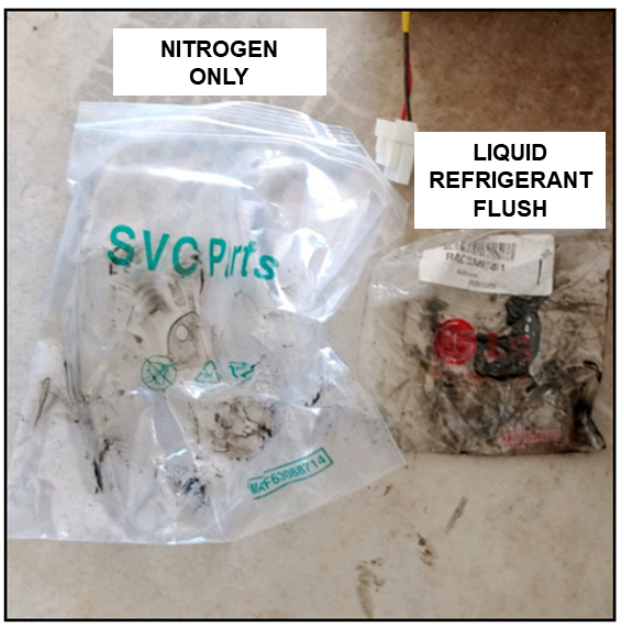
Nitrogen is dry and is very good to push restrictions and most debris out, however the liquid refrigerant will pick up other debris that may be missed by nitrogen, To achieve a clean unit both types of flushing are recommended .
*Reminder: If needing to flush through the 3-Way Valve:
1)Press the Test Button 1 time
2)Wait 10-15 Seconds
3)Unplug Unit from the wall.
This will fully open your 3-Way valve to both sides of the system.
- If you find contamination causing restrictions in any section of the sealed system tubing, it is highly recommended to go the extra step and check for a Low Side leak at your evaporator coil(s). Most of the time if there is sludge in the system it is caused by a low side leak allowing moisture in the system and mixing with the compressor oil.
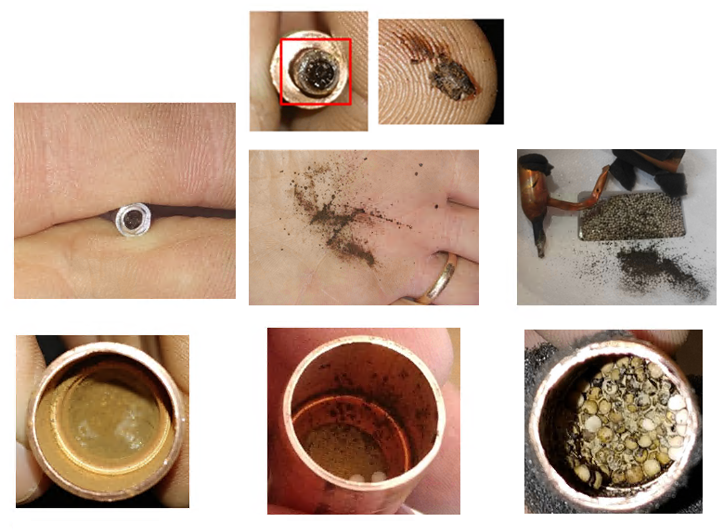
- If you do find contamination in the Drier as shown below or in the yoder loop it is recommended to replace the condenser as those contaminants would have traveled through it to make it to the drier and the condenser is likely contaminated as well.
Examples Below:
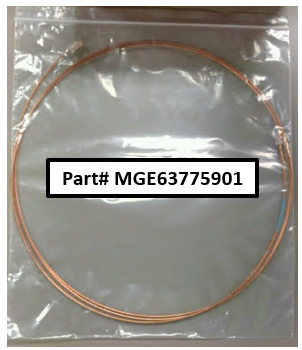
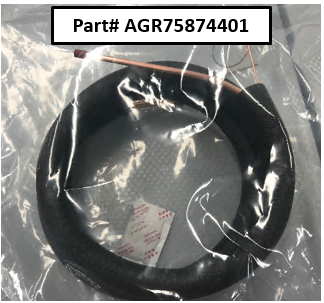
If you do find a restriction in a Capillary Tube or Suction line and are unable to flush it out using the Nitrogen and Refrigerant Flush Method then the below parts are available:
Cap Tube Replacement
French Door, Bottom Mount, Side-by-Side
Single/Dual Evaporator
Heat Exchanger Replacement
French Door/Bottom Mount/Side-by-Side
Single Evaporator Models Only
2 Responses
Do you have instructions on installing AGR75874401 in this side by side?
There are no specific instructions for the Side-By-Side. However, the process is the same, you would need to make a hole to push the heat exchanger through to the freezer section at the evap coil. The hole would need to be close to where the current heat exchanger enters at the evap area. But the only reason this part would be needed is if you have identified an issue with the suction line.