RESTRICTION CLOSE TO COMPRESSOR
Note: Click here for 2 related training videos (Located at the end of this article)
Now that you have accurately diagnosed the issue with the sealed system, click the below button for Sealed System Repair Contents:
Below is an example of what your pressures would look like if the restriction is located close to the compressor. The reason your pressures do this is because there is not enough room in the high side of the system for the compressor to push the refrigerant off itself:
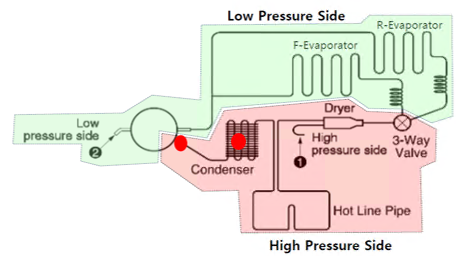
If the system is Restricted closer to the compressor (as indicated with Red Dots above) then you will see a different result than restrictions past the condenser. These type restrictions would be located:
– At the Compressor to Discharge Line Connection
– In the Discharge Line
– In the beginning to middle of the Condenser Coil.
Restrictions in these areas will cause extra strain on the compressor because it cannot push the refrigerant past itself.
Key Indicators:
– You will often hear the compressor straining to pump.
– Increased Amp Draw.
– Increased Voltage.
– Compressor turning off soon after plug in.
– 6 Blink Codes.
To Repair: Remove restriction or replace restricted part, replace compressor and drier as well due to possible damage done to the compressor.
Restriction Close to Compressor Video:
Restriction Removal Procedure Video:
Now that you have identified the issue with the sealed system and made your repair make sure you achieve a proper vacuum before recharging the unit.
The reason for pulling a deep vacuum is to make sure the system is leak free and all moisture and non-condensables have been removed from the sealed system before recharging the system. This should be performed on every sealed system repair and every time the sealed system is opened for any reason.
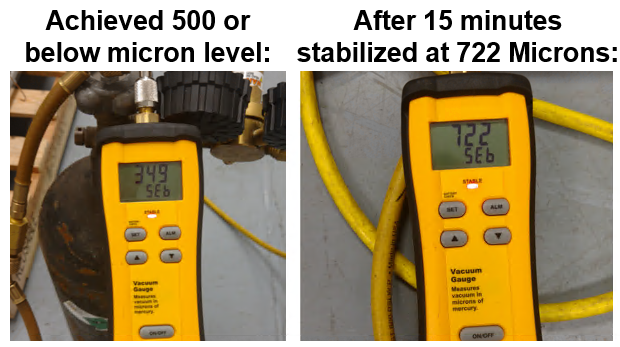
The industry standard for a proper vacuum is to reach 500 microns. But don’t stop there…. By monitoring your Micron Gauge you can learn valuable information about the sealed system.
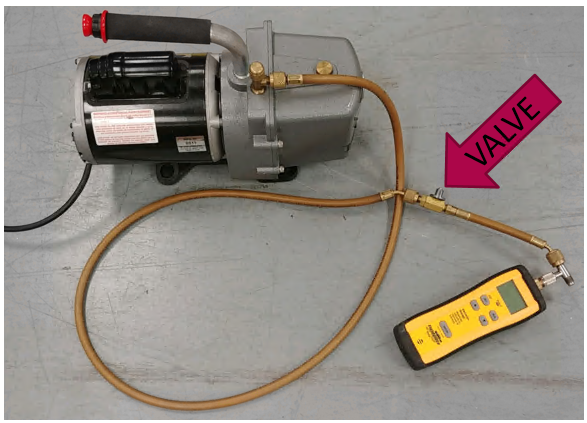
Once you reach 500 microns, isolate the system and micron gauge from the vacuum pump and watch your micron level to see how far it rises. To do this you will need an isolation valve between the vacuum pump and micron gauge:
- Once you have reached 500 microns and isolated your pump what happens next will tell you if you still have issues within the sealed system. It is important that you analyze the micron level for 10-15 minutes after isolating the pump and look for the below conditions…
1) If the micron level rises above 2000 this is an indication that there is still a leak somewhere in the system. Locate the leak, repair, and pull vacuum again.
2) If the micron level stabilizes between 1000-2000 microns this is an indication that there is still moisture/non-condensables in the system. If this occurs, you need to pull your vacuum longer until the micron level stays stable under 1000. (Tip: If there is moisture/non-condensables in the system you can purge the system with nitrogen to clean the system quickly then pull your vacuum again.)
3) The goal to know that you have a leak free and clean system is for your micron level to stabilize below 1000. If you achieve 500 microns and stabilize under 1000 you are good to go ahead and recharge the system like the example below:
Note: If you are having trouble achieving 500 microns make sure your equipment is not the issue. Maintaining your vacuum pump oil, micron gauge, and manifold gauge seals / hoses is very important. If your equipment is in question, try pulling a vacuum on the equipment itself to see if it can achieve and hold proper levels.