Low Side Leak
Note: Click here for a related training video (Located at the end of this article)
Now that you have accurately diagnosed the issue with the sealed system, click the below button for Sealed System Repair Contents:
If the unit has a Low Side Leak you will find your Low Side pressure is lower than normal and your High Side pressure is higher than normal. Amp Draw and Voltage will be higher than normal and there will be Partial to no frost pattern.
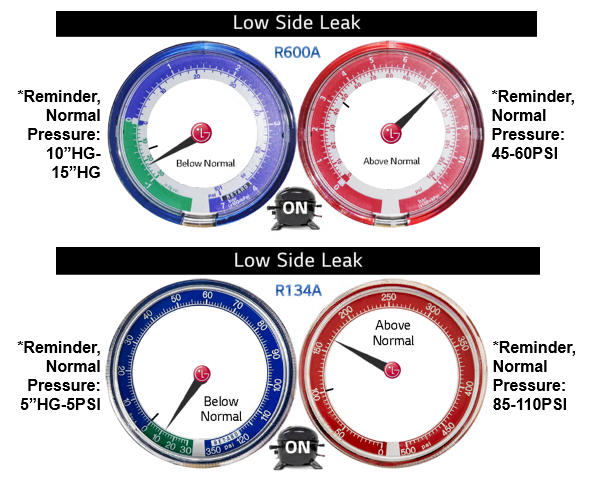
The reason the High Side pressure increases is because the Low Side of your System is the “Suction” side of the system. The compressor is sucking in air , moisture, contaminants and causing the increase in pressure and causing strain on your compressor.
The Low Side of your system is your Evaporator Coil(s) and suction line.
The majority of the Low Side leaks we see come from the Refrigerator Evaporator Coil on the dual evaporator models and there are some common places to look for these leaks that will be demonstrated below. (This does not mean that Freezer Evaporators never leak, if your high side pressure is elevated always check all portions of the low side of the system).
When a Low Side leak is identified the Compressor, and Drier must always be replaced along with the leaking coil if it cannot be repaired. Also, you need to look for sludgy oil contamination in the condenser, yoder, and drier.
If sludge is found in any of these areas, it is suggested to thoroughly flush the Condenser and the Yoder Loop to avoid Restrictions and Reclaims.
Below are examples of common Low Side Leaks on the Evaporator Coils.
These type leaks are often very small. It is suggested to pressurize the system to 200 PSI with nitrogen and use bubble solution to locate the leak.
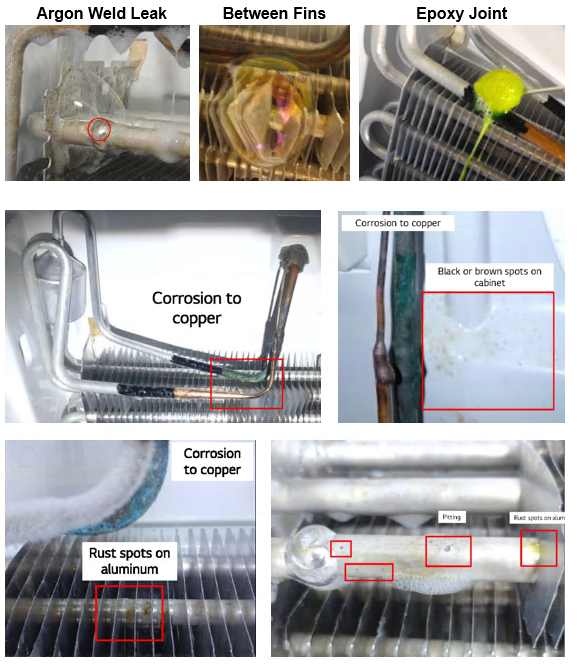
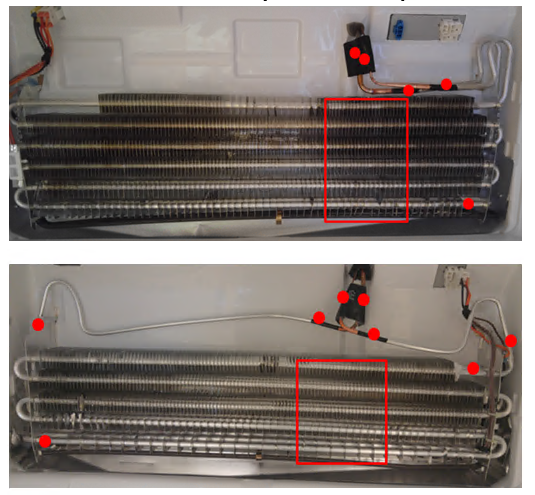
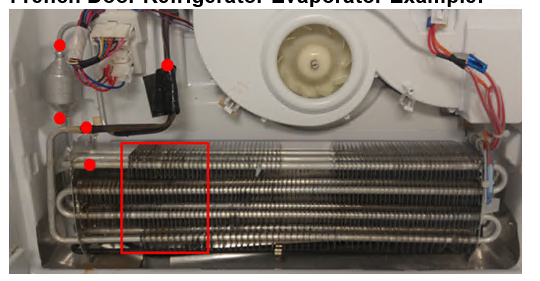
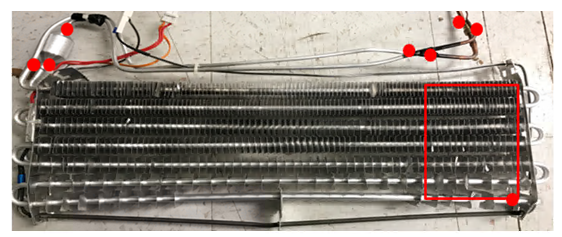
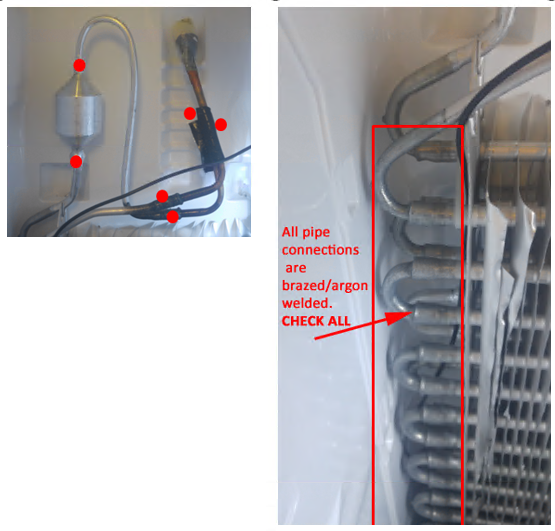
Below are the common joints at your evaporator coils. These should all be checked if a low side leak is suspected…..
French Door Freezer Evaporator Examples:
French Door Refrigerator Evaporator Example:
Top Mount Refrigerator Evaporator Example:
Side-by-Side Refrigerator Evaporator Example:
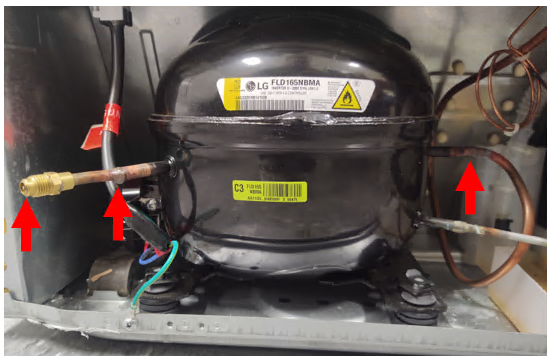
Reminder: The suction line connection at the compressor and the process stub are part of the low side of the system. If your High Side Pressure is elevated and you can find no leaks at the evaporator coils do not forget to check here. These type leaks most often take place after a repair attempt has been made already. Also be sure the Schrader valve in the process stub is seated correctly and not causing your issue.
Once you have identified a Low Side leak it is very important to check the rest of the system for sludgy oil and contamination. Remember that the low side is the “Suction” side so air & moisture is being pulled into the system from the leak point. Moisture that mixes with the oil in the system causes contamination & restrictions if not addressed.
Below are some examples of contamination that caused restrictions as a result of the unit having a Low Side leak.
The restrictions normally occur in the condenser, yoder loop, and drier.
If contamination is found in the system flush the lines with nitrogen followed by liquid refrigerant. The refrigerant will need to be recovered during this process. If heavy contamination is found in the condenser it is easier to replace the coil than to flush out.
To summarize it is very important that once you have identified a Low Side leak you look further in the system to make sure there is no contamination that will lead to restrictions once you replace the leaking evaporator, compressor and drier.

Now that you have identified the issue with the sealed system and made your repair make sure you achieve a proper vacuum before recharging the unit.
The reason for pulling a deep vacuum is to make sure the system is leak free and all moisture and non-condensables have been removed from the sealed system before recharging the system. This should be performed on every sealed system repair and every time the sealed system is opened for any reason.
The industry standard for a proper vacuum is to reach 500 microns. But don’t stop there…. By monitoring your Micron Gauge you can learn valuable information about the sealed system.
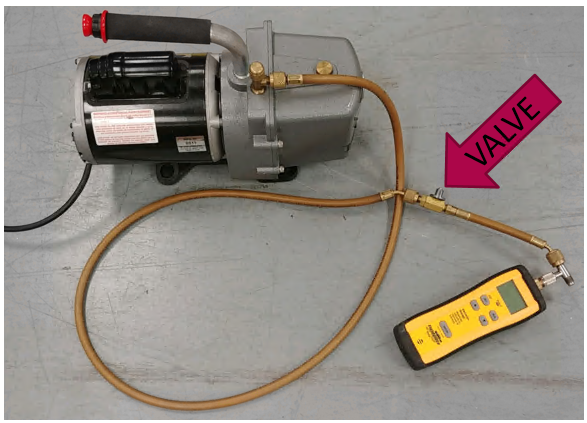
Once you reach 500 microns, isolate the system and micron gauge from the vacuum pump and watch your micron level to see how far it rises. To do this you will need an isolation valve between the vacuum pump and micron gauge:
- Once you have reached 500 microns and isolated your pump what happens next will tell you if you still have issues within the sealed system. It is important that you analyze the micron level for 10-15 minutes after isolating the pump and look for the below conditions…
1) If the micron level rises above 2000 this is an indication that there is still a leak somewhere in the system. Locate the leak, repair, and pull vacuum again.
2) If the micron level stabilizes between 1000-2000 microns this is an indication that there is still moisture/non-condensables in the system. If this occurs, you need to pull your vacuum longer until the micron level stays stable under 1000. (Tip: If there is moisture/non-condensables in the system you can purge the system with nitrogen to clean the system quickly then pull your vacuum again.)
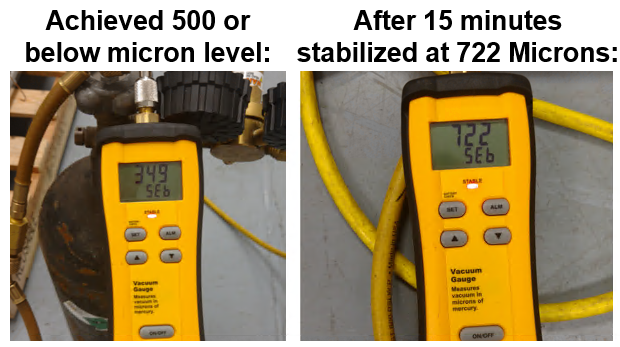
3) The goal to know that you have a leak free and clean system is for your micron level to stabilize below 1000. If you achieve 500 microns and stabilize under 1000 you are good to go ahead and recharge the system like the example below:
Note: If you are having trouble achieving 500 microns make sure your equipment is not the issue. Maintaining your vacuum pump oil, micron gauge, and manifold gauge seals / hoses is very important. If your equipment is in question, try pulling a vacuum on the equipment itself to see if it can achieve and hold proper levels.
One Response
Low side leak found